Introduction
Welcome to the third and final article of the Android Performance Optimization series! In the first article, we explored the fundamentals of performance optimization, focusing on CPU and battery. In the second article, we deep-dived into the crucial topic of RAM memory optimization and memory leaks. Now, it’s time to focus on UI optimization and rendering efficiency.
Traditionally, Android used the XML-based way to build UIs; in recent years Google followed the trend of declarative UI creation and released Jetpack Compose. Even though new projects tend to follow the Jetpack Compose approach there is still an extensive amount of Android apps that are based on the XML approach. Therefore, in this article we will include optimization techniques for both.
We will start with techniques that are applicable to both approaches, then we will continue with the XML, and finally, we will focus on optimizing Jetpack Compose UIs.
By implementing the practical techniques presented here, you can ensure your app delivers a smooth, responsive user experience.
Common techniques
Avoid UI Overdraw
Overdraw happens when the same pixel on the screen is drawn multiple times. This is common with overlapping UI elements. While the system needs to render elements in a specific order for transparency effects, excessive overdraw wastes GPU power and may cause a slow rendering time and responsiveness.
With XML, we can introduce UI overdraw when using FrameLayout and with Jetpack Compose when adding views on a Surface on top of each other.
To identify and fix overdraw, enable developer options and use the overdraw visualization tool. This will highlight areas where pixels are being drawn unnecessarily, allowing you to optimize your UI layout and element usage for better performance.
In order to enable the overdraw visualization tool, open up your device or emulator and navigate to the developer options. Enable the option Debug GPU overdraw.

Now, you can run your application, and you will notice all the overdraw areas based on the color code. For example, in the screenshot below, the app bar is drawn on top of the screen, and we can see there is an overdraw. The same is happening with the app bar options.

Furthermore, if we drag the pull-to-refresh component, we will see the emulator indicating an overdrawn element.

Obviously, you can't avoid all overdraw cases, some, like this one, exist by design. But you can identify and fix the unintended ones.
Use animations sparingly
Animations are resource intensive. And while they can add polish to your app, it's crucial to use them sparingly. Excessive animations can overwhelm users and strain system resources. Think of them as sprinkles on a cupcake - a little adds delight, but too much can overpower the taste. Use animations strategically to highlight key actions or guide users through a process, but prioritize clarity and performance over constant movement.
Avoid processing in the UI thread.
This is probably the most important technique for building a responsive application and avoiding ANRs. An ANR (Application not responsive) occurs when you keep the Main thread busy for too long. In those cases, the OS prompts the user to kill the application. This is the worst possible UX other than an application crash.
Heavy data processing, as well as tasks like HTTP requests and database queries, must always happen on background threads. There are several techniques for performing those tasks in background threads, like using background services, async tasks, and more modern techniques like Reactive Programming or Kotlin Coroutines.
Regardless of which one you choose to perform your background work, the important thing is to avoid doing it in the Main thread.
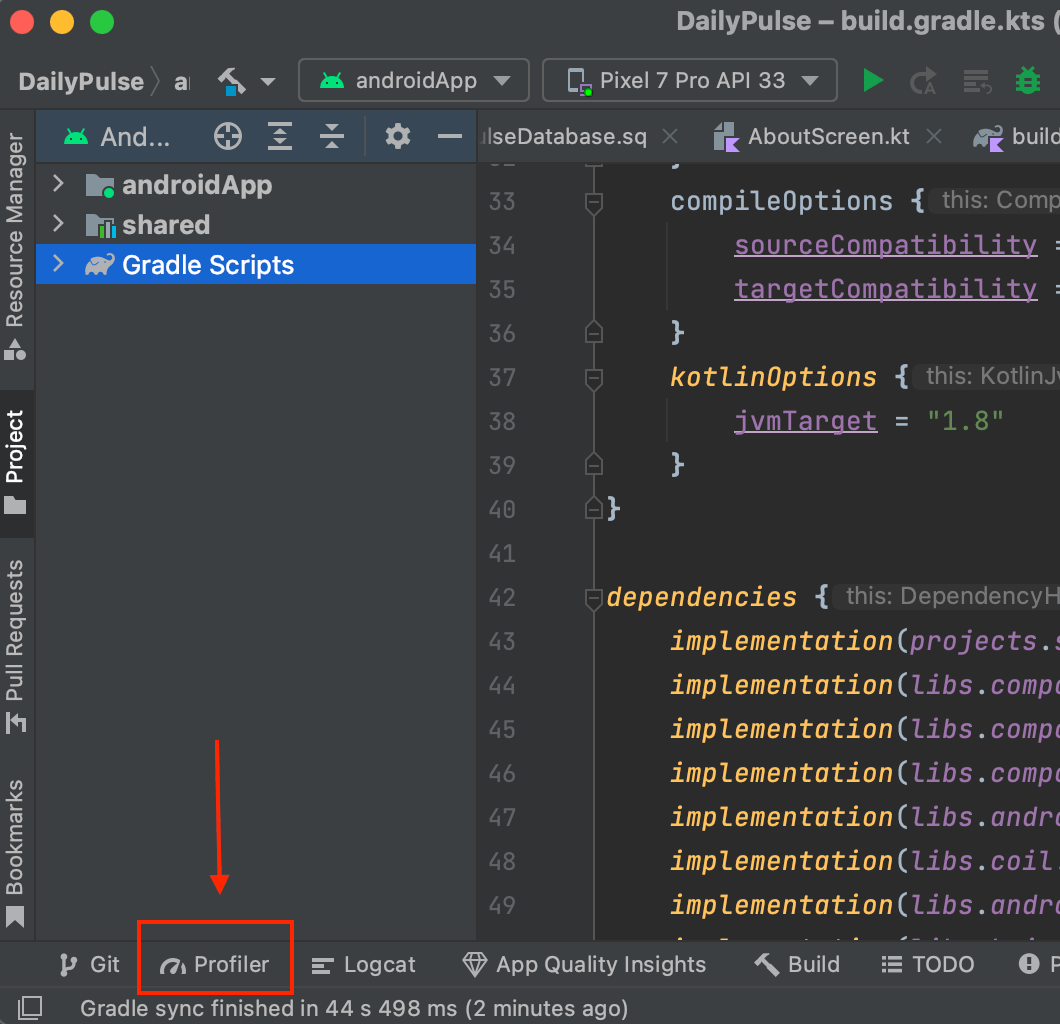
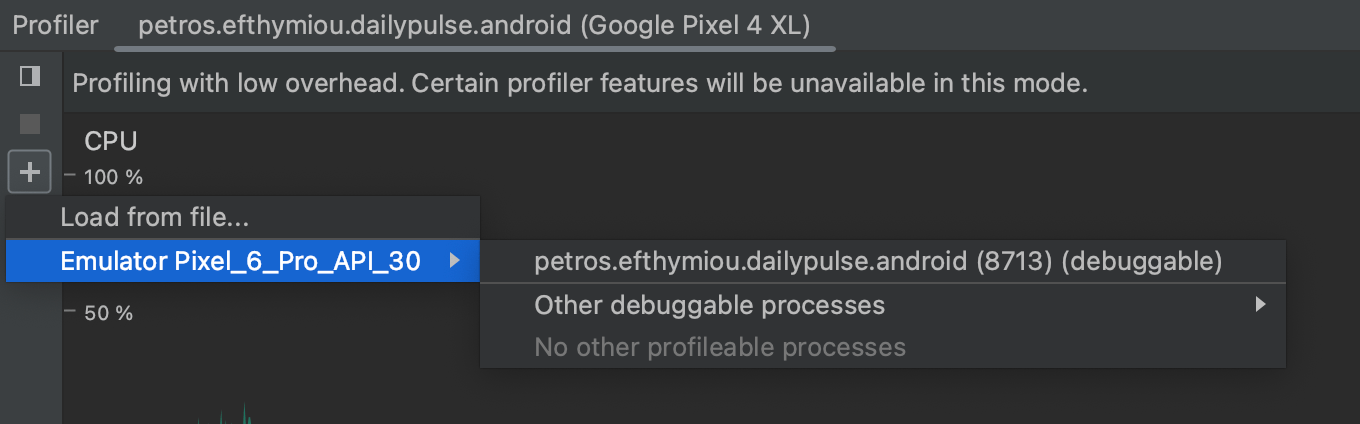
Profile the Hardware UI rendering.
Unlike the GPU, RAM and battery consumption, we cannot monitor the UI performance from Android Studio. Instead we need to go to the developer options of our device or emulator and enable the Profile HWUI Rendering option.

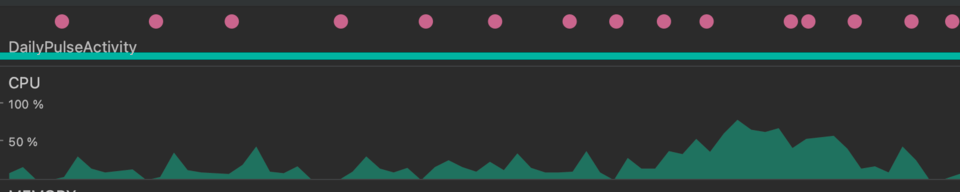
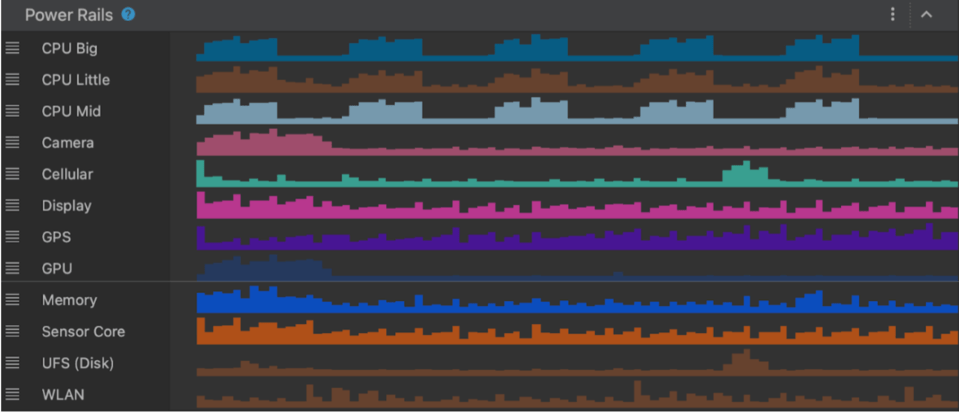
Here I prefer to use the option On screen as bars. Once you click on this option, you will start seeing a bar chart on your screen that looks like this:

You can interpret the bar chart as follows:
- For each visible application, the tool displays a graph.
- Each vertical bar along the horizontal axis represents a frame, and the height of each vertical bar represents the amount of time the frame took to render (in milliseconds).
- The horizontal green line represents 16.67 milliseconds. To achieve 60 frames per second which assures an optimal UX, the vertical bar for each frame needs to stay below this line. Any time a bar surpasses this line, there may be pauses in the animations.
- The tool highlights frames that exceed the 16.67 millisecond threshold by making the corresponding bar wider and less transparent.
- Each bar has colored components that map to a stage in the rendering pipeline. The number of components vary depending on the API level of the device.
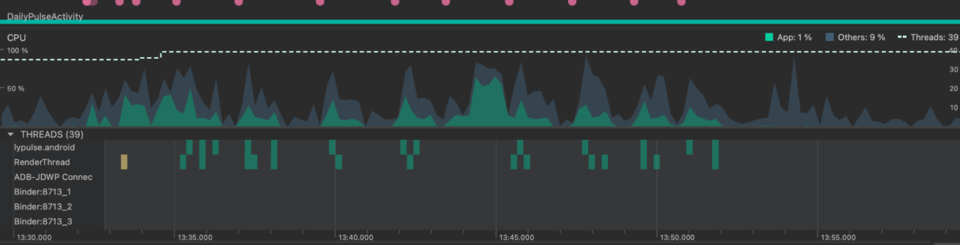
For example:

In this application, the first line, the longest one, represents the application startup. The second big line in the middle occurred when I navigated from one screen to another and this caused a rendering overload.
Using this tool, you can identify the most GPU resource-heavy screens and transitions and start focusing on optimizing those.
For more info regarding the HWUI profiling, you can visit the official documentation here: https://developer.android.com/topic/performance/rendering/inspect-gpu-rendering
XML UI Optimization�
Now, let’s focus on a few techniques that will help you optimize the XML-based Android UIs.
Flatten View Hierarchy
A deep view hierarchy with lots of nested layouts can lead to performance issues in your Android app. A complex hierarchy forces the system to measure and layout views in a nested fashion. Flattening the hierarchy reduces these nested calculations, leading to faster rendering and smoother UI updates.
Furthermore, a simpler view hierarchy is easier to understand and debug. This saves development time and makes it easier to identify and fix layout issues.
ConstraintLayout excels at creating complex UIs with a flat view hierarchy. Unlike layouts like RelativeLayout, which rely on nested ViewGroups, ConstraintLayout allows you to position views directly relative to each other or the parent layout using constraints. This eliminates unnecessary nesting, resulting in a simpler and more efficient layout structure. The reduced complexity translates to faster rendering times and a smoother user experience, especially on devices with less powerful hardware. Additionally, ConstraintLayout's visual editor in Android Studio makes it intuitive to define these relationships between views, streamlining the UI development process.
For more information about Constraint Layout you can check the following article: /blog/constraintlayout
Make use of the View Stub
Not all sections of your UI are needed right away. Imagine a comment section that only appears when a user taps a "show comments" button. Most apps are implementing this using the View visibility attribute.
There's actually a more performant option called ViewStub. It acts as a placeholder in your layout, taking up zero space. When needed, you can inflate a complex layout (like the comment section) into the ViewStub's place. This keeps your initial UI load faster and smoother, and only inflates resource-intensive views when absolutely necessary. This improves both performance and memory usage in your Android app.
    <ViewStub android:id="@+id/stub"
               android:inflatedId="@+id/subTree"
               android:layout="@layout/mySubTree"
               android:layout_width="120dip"
               android:layout_height="40dip" />
Of course, not every element that changes visibility during its lifecycle needs to be a View Stub. View stubs currently don’t support the merge tag, and can’t be used more than once. This element is best used on Views that may not appear at all. Some examples can be error messages or advertising banner campaigns.
Recycler View and View Holder Pattern
Using the RecyclerView with the ViewHolder pattern is crucial for efficient and optimized handling of large datasets in Android applications. The ViewHolder pattern enhances performance by recycling and reusing existing views, thus minimizing the overhead of creating new view instances. This approach significantly reduces memory usage and improves scrolling performance, especially when dealing with long lists or grids. By binding data to reusable ViewHolder objects, RecyclerView ensures smooth and responsive UI interactions while dynamically adapting to changes in dataset size. Ultimately, implementing the RecyclerView with the ViewHolder pattern is not just a best practice but a fundamental strategy for delivering high-performance and scalable user interfaces in Android apps.
For more info on this subject, you can refer to the following article: /blog/recyclerview-vs-listview
Jetpack Compose Optimization
Now, let’s move our focus to Jetpack Compose. Compose is inherently built to be more performant than XML. Basically, that’s one of the reasons for the declarative UI paradigm shift in all platforms. When a screen element changes, they avoid redrawing the whole screen. They try to keep everything as is, and they only redraw the changed element.
Notice the keyword there — “try”. Compose will trigger recomposition when snapshot state changes and skip any composables that haven’t changed. Importantly though, a composable will only be skipped if Compose can be sure that none of the parameters of a composable have been updated. Otherwise, if Compose can’t be sure, it will always be recomposed when its parent composable is recomposed. If Compose didn’t do this, it would be very hard to diagnose bugs with recomposition not triggering. It is much better to be correct and slightly less performant than incorrect but slightly faster.
You can see how many times a View has been redrawn on the screen using the layout inspector:

This way, you can identify which Views keep getting redrawn and may potentially be optimized, as we will show below.
Skippable UI Elements
The compose compiler is trying during compile time to identify which Composable elements are skippable. Meaning that if their own data hasn't changed, they don't need to get redrawn on the screen. It’s clear that the more skippable components you have on your screens, the more performant your UI is going to be as it avoids redrawing unchanged elements.
So the question is, how can you make your Composables skippable? The answer is simple: Immutability!
Is the following Composable skippable?
@Composable
private fun PlaylistRow(
   playlist: Playlist
) {
   Column(Modifier.padding(8.dp)) {
       Text(
           text = playlist.name,
           style = MaterialTheme.typography.bodySmall,
           color = Color.Gray,
       )
       Text(
           text = playlist.length.toString(),
           style = MaterialTheme.typography.bodyLarge,
       )
   }
}
The answer is we can’t tell unless we study the Playlist model.
With the following playlist model, is our Composable skippable? What do you think?
data class Playlist(
   val id: String,
   val name: String,
   var length: Int
)
The answer is no. Because the length is a mutable variable that might have changed without Jetpack Compose knowing.
We can make our PlaylistRow skippable by making length an immutable value by changing var -> val.
data class Playlist(
   val id: String,
   val name: String,
   val length: Int
)
Now if we change our Playlist model as below, will our Playlist row still be skippable or not?
data class Playlist(
   val id: String,
   val name: String,
   val length: Int,
   val songs: List<Song>
)

data class Song(
   val id: String,
   val name: String
)
The answer is not because Kotlin List is mutable. It is compile-time read-only but not immutable. The underlying data can still be changed and Compose compiler is not going to take any risks.
Use a kotlinx immutable collection instead of List
data class Playlist(
   val id: String,
   val name: String,
   val length: Int,
   val songs: ImmutableList<Song>
)
Version 1.2 of the Compose compiler includes support for Kotlinx Immutable Collections. These collections are guaranteed to be immutable and will be inferred as such by the compiler. This library is still in alpha, though, so expect possible changes to its API. You should evaluate if this is acceptable for your project.
Finally, you can also decide to annotate your model with the @stable annotation if you are certain that it is skippable. But this can be dangerous. This way you are instructing the Compose compiler that even though a model might be unstable, I want you to treat it as stable and the respective Composables that use it as skippable.
It’s dangerous because the values of the object may have been changed, but Compose may not have noticed it and still be showing the old values, leading to sketchy bugs. Annotating a class overrides what the compiler inferred about your class. In this way, it is similar to the !! operator in Kotlin.
For debugging the stability of your composables you can run the following task:
./gradlew assembleRelease -PcomposeCompilerReports=true
Open up the composables.txt file and you will see all of your composable functions for that module and each will be marked with whether they are skippable and the stability of their parameters.
restartable scheme("[androidx.compose.ui.UiComposable]") fun DisplayPlaylists(
   stable index: Int
   unstable playlists: List<Playlist>
   stable onPlaylistClick: Function1<Long, Unit>
   stable modifier: Modifier? = @static Companion
)
Lazy Column
Similar to what we saw in the XML approach, Compose also has a mechanism to optimize large lists and that’s the Lazy Column component. Lazy Column is optimized to display large datasets in a list as it avoids unnecessary pre-calculations. We have a wonderful article here that explains the differences between Column and Lazy Column in this link
Conclusion
In this series of articles, we analyzed how you can profile your app in order to identify performance issues with
- Battery
- CPU
- RAM memory
- UI rendering
We also explained optimization techniques that you can include in your toolset in order to resolve those issues.
What I would like you to keep from this series is that you should be profiling much more than optimizing. Premature optimization will slow down your team and product without providing much value.
Profile often, optimize when necessary.